Tulli Snax
Today I needed some instant gratification + I just got my new color laser printer. So, the combo led me to try image transfer onto encaustic. Not hard to do but I did learn by mistakes along the way.
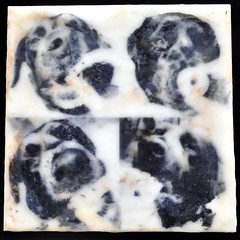
I chose my doggie, Tulli as my subject and picked a group of photos that I changed to black and white in Photo Shop Elements 8 (PSE). I started with my four color photos and added a layer - gradient map to each one. This will change the photo to black and white. I then added a levels layer and tweeked around with that to get higher contrast. Probably not the proper way to do it, but it works for me.
I cropped each of the four photos and then added them one by one creating the matrix in a new file. I'm sure there is some easy way to pop them into a foursome like this so if anyone knows - please share. I did it by resizing each photo. My board is 6x6, so each photo was 3x3.
I then flattened the image. When I printed it, it came out too dark. So, I added a brightness/contrast layer to the flattend image and cranked up the brightness - much better.
After preparring my panel with about 6 layers of medium I was ready to start. On the warm wax I placed my photo print (on regular computer paper) image side onto the warm wax. I then took a nice polished stone and burnished the backside of the paper. Then I added some water to dampen the paper and burnished lightly again. Then I soaked the paper and rubbed in little soft circles. The paper starts balling up and the idea is that the ink is transferred onto the wax and your job is to carefully with a light touch rub the paper pulp away and leave the image transferred onto the wax. I actually did this process twice with medium in between. I then rubbed some oil stick in burnt umber into the pocks in the wax. Heated again and voila!
Lessons Learned
- A light touch on the rubbing the paper off the back is very important. Too hard and the ink image will come up with the paper - not good.
- Burnish, burnish again and make sure you really rub it down well. Not too hard or you tear the paper or dent the wax.
- Patience is virtue - take your time, enjoy the process of removing the paper. Too fast and things don't work out.
No comments:
Post a Comment